Results 1 to 38 of 38

Thread: Another new FST

  1. #1
    Senior Member
    Join Date
    10.06.08
    Location
    CT
    Posts
    371
    Liked: 22

    Default Another new FST

    I started Vee racing a few years back, and have raced a few differnet cars. I've had an Autodynamics, a Lynx, a Womer and finally last year a D-13. I even rented an ex Lisa Noble Protoform to get thru SCCA school (Thanks to Dick Stewart). Over the winter I saw a Caracal D on the market... I always loved them, but could never fit. I was very lucky... this is one of the few that is built for a larger driver, it's wider in the shoulders and the roll bar is very high. I'm 6'1" and fit well in the car, sitting in the car, the original head rest was at my shoulders. The back of the chassis was updated with added triangulation in the areas that can stress and sometimes crack in early Caracal's. With the larger bars and updated tail more weight was added, a perfect candidate for an FST conversion. Over the years while Vee racing I've been picking up FST parts along the way... so I already had many of the parts needed. I've been waiting for a few more people in the Northeast to convert and race at my local tracks. I found out this year an NER fellow racer and actually my SCCA instructor was converting his car, so, it's time to come out of the closet! LOL

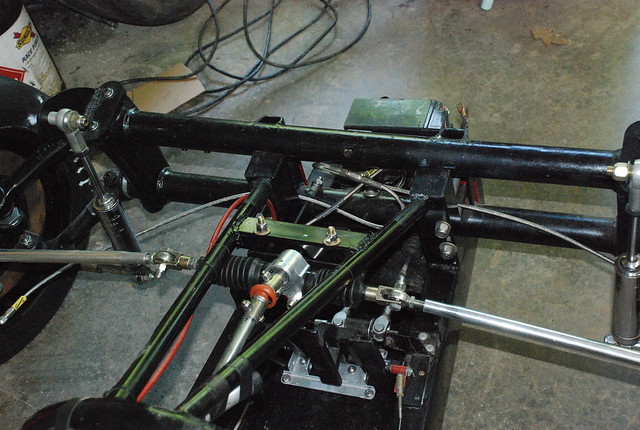
    Here's a few pictures of the car before... I did some of the work over this past winter, I'll be posting pictures and info shortly of the final build.


    Last edited by veefan; 05.31.12 at 10:53 PM.

  2. #2
    Contributing Member provamo's Avatar
    Join Date
    05.24.04
    Location
    Amherst, New York but i left my heart in San Francisco
    Posts
    2,667
    Liked: 295

    Default

    congrats on the upgrade!

    i see Ca. plates on the bug but the sun in the photos does not look like the sun in New England..........what gives?

  3. #3
    Global Moderator Bill Bonow's Avatar
    Join Date
    08.18.02
    Location
    Plainfield, IL
    Posts
    2,663
    Liked: 190

    Default Coast to the other coast

    Ralph,

    This was Mark Fischer's car from LA.

    John,

    Congrats on the project, should turn out to be a great FST.
    Bill Bonow
    "Wait, which one is the gas pedal again?"

  4. #4
    Senior Member
    Join Date
    10.06.08
    Location
    CT
    Posts
    371
    Liked: 22

    Default Das build

    Before I get into some of the build, I really have to say a Special Thanks to Jim Schings, Robert Guhde and most importantly Bill Bonow who have given me a lot of info and support.

    Chassis broken down


    Chassis rear, additional support can be seen


    Too many gauges...???


    Beam (mounted with zip ties) and nose fitted


    After getting a feel for how I was going to modify the nose and mount the beam. I wanted to keep the car as dual purpose as possible. So rather then drill new holes in the chassis. I decided to drill new holes in the beam. I created steel hole templates and transferred the holes to the beam.


    It's recommended that plates be fabricated to offer additional support to the beam


    With the beam mounted, reworking the nose to fit the ball joint beams different dimensions.


    Also did a little house keeping, pedals needed a restore and clean up.


  5. #5
    Contributing Member provamo's Avatar
    Join Date
    05.24.04
    Location
    Amherst, New York but i left my heart in San Francisco
    Posts
    2,667
    Liked: 295

    Default

    does anyone know how many FST exist stateside (racing or parked, under construction and or conversion)?

    what is the hotbed of this class?

  6. #6
    Global Moderator Bill Bonow's Avatar
    Join Date
    08.18.02
    Location
    Plainfield, IL
    Posts
    2,663
    Liked: 190

    Default

    Ralph,

    We try to keep it up to date.

    http://www.apexspeed.com/forums/showthread.php?t=30640

    Post # 1
    Bill Bonow
    "Wait, which one is the gas pedal again?"

  7. #7
    Senior Member
    Join Date
    11.08.07
    Location
    Rochester, NY
    Posts
    742
    Liked: 156

    Default Very interesting

    John

    The slightly higher H beam sure does complicate things up front. When I did the Mysterian I simply raised the front uprights behind the H-beam. Its really great to see another approach taken.

    Also are you going with an external sway bar? Your beam has adjusters top and bottom---or does it?

    Thanks for posting the progress report. I thnink every loves to look at these cars coming together.

  8. #8
    Senior Member
    Join Date
    10.06.08
    Location
    CT
    Posts
    371
    Liked: 22

    Default Beam

    The beam had adjusters on top and bottom, when I bolted it up, I realize the bottom adjuster was in the of the way of the masters. I cut it down and locked it in place using an upper hole. The bottom tube is is the sway bar beam. I'm using the stock spring set, went with a lighter 9/16 sway bar..

    TIP... the ball joint beam uses different size spacers depending on which tube you use as the sway bar tube.

  9. #9
    Senior Member
    Join Date
    10.06.08
    Location
    CT
    Posts
    371
    Liked: 22

    Default Brembo brakes..

    I followed the advise of the FST guide and started to clearance the calipers while mounted. The angle makes it really hard to work on the calipers, and yes, you want to mount them on the right side... the sparks start to hurt a little if you try it on the left side.


    I also took a little different approach, it took longer, but was a little easier to grind. I marked the caliper with a sharpie, mounted it and hand held on the rim on the rotor, spun it and observed the marks on the caliper. Removed it, locked it in a vice and ground in the area with scratches. Marked up the caliper again and repeated the process... alot of times.


    One of my sons came by, aka the young tuner kid and said... what are you doing... I said I'm setting up my FST brakes... brakes he said... who makes gold calipers... oh... "hey dad, here's a can of Brembo Red caliper paint, they'd look cool if they were red"...

    OKIE, ruff up with a scuff pad, and clean with prep solve...


    Remove pads, hardware, connectors and tape up every thing else...


    Mounted.... LOOKS NICE


    While I was at it,,, opted to paint the rotors also.... don't like the rusty look...
    NOTE: both the rotors and calipers MUST be painted with High Temp Caliper/Rotor Paint


    Rotor, studs and bearing area all taped or caped off.


    I wanted to go with the rocker style shock suspension... but opt'ed to go quick and easy... SR shock mounts and BB lowers...


    Cut the towers, capped them and painted the beam


    Last edited by veefan; 06.06.12 at 4:13 PM.

  10. #10
    Senior Member
    Join Date
    10.06.08
    Location
    CT
    Posts
    371
    Liked: 22

    Default Das Build

    Continuing the build...

    Ruffed in the rack mount


    Tacked in the rack mount.


    bolted all the stuff up. (shortie vee shocks fit great)


    Bolted up the rack and test fit everything. I'll need to check the bump and steering dynamics. The rack I'm using has a really quick ratio

    Last edited by veefan; 06.05.12 at 12:04 PM.

  11. #11
    Senior Member
    Join Date
    10.06.08
    Location
    CT
    Posts
    371
    Liked: 22

    Default almost done...

    Bolted in the Vallis/Rice FST transaxle added a new slave cylinder, and a REBUILT 12V Starter, it was $41.99 from Autozone, guaranteed for life & and bosch??? wow, I was told converting to FST wouldn't save money in the long run???

    http://www.autozone.com/autozone/par...mString=search


    I hate driving in the rain, replaced the old school rain light (on the right) with a 10 led super bright light.


    Added the rear calipers and rotors... just need the power plant, updated body work, and new tires (good for about 15+ heat cycles) almost ready to race.

    Last edited by veefan; 06.06.12 at 8:07 AM.

  12. #12
    Senior Member
    Join Date
    11.08.07
    Location
    Rochester, NY
    Posts
    742
    Liked: 156

    Default What!!!

    John

    Did you take a day off!!

  13. #13
    Senior Member
    Join Date
    10.06.08
    Location
    CT
    Posts
    371
    Liked: 22

    Default I'm in a "Slump"

    Or actually sump, trying to figure out how to get a very large "peg" into a very small hole... It was a Sprint car sump so just a tad big for my needs.

    Tank is 6" OD and 26" tall including neck and cap, has four AN-12 fittings. I have step down fittings to bring the AN 12's to AN 8. Measured it out to be about 16" high to get me 7 Quarts. I'm going remove part of the center section and drop it off at my friends house down the road whos a professional welder.


  14. #14
    Senior Member
    Join Date
    11.08.07
    Location
    Rochester, NY
    Posts
    742
    Liked: 156

    Default

    John

    Maybe Jason wouldn't mind posting a pic of his DS tank again. You might want to see it before cutting and welding.

  15. #15
    Senior Member
    Join Date
    10.06.08
    Location
    CT
    Posts
    371
    Liked: 22

    Default Got Stickers... and a Mr Fusion?

    Finally got some stickers, and modified the steering. New rack, new position, added Cambell steering brackets to correct steering issues. Need to figure out how to get the Back to the Future style Mr. Fusion thingie to fit...


    Tie rods now sit nice and level when the cars on the ground (cars still on a dolly in these pics)


    SO the sloffie boys, came into the garage today,,, and said wow dad, now that looks like a race car!!!!


    Back to the Future Mr. Fusion thingie


    I really need a different oil sump tank...

  16. #16
    Contributing Member DanW's Avatar
    Join Date
    03.22.03
    Location
    Benicia, Calif
    Posts
    3,160
    Liked: 977

    Default Wheel studs?

    Are you using press in studs on the cast rotors, screw in studs, or fully threaded bolts threaded in from the back of the rotor?

    Thanks,
    Dan Wise
    “Racing makes heroin addiction look like a vague wish for something salty.” -Peter Egan

  17. #17
    Senior Member
    Join Date
    10.06.08
    Location
    CT
    Posts
    371
    Liked: 22

    Default

    They are not threaded rods, not sure 100% but I think they are pressed in studs from the back of the rotor.

  18. #18
    Contributing Member provamo's Avatar
    Join Date
    05.24.04
    Location
    Amherst, New York but i left my heart in San Francisco
    Posts
    2,667
    Liked: 295

    Default

    Quote Originally Posted by DanW View Post
    Are you using press in studs on the cast rotors, screw in studs, or fully threaded bolts threaded in from the back of the rotor?

    Thanks,
    Dan Wise
    as a matter of general interest.............is there a preferred practice?

  19. #19
    Contributing Member DanW's Avatar
    Join Date
    03.22.03
    Location
    Benicia, Calif
    Posts
    3,160
    Liked: 977

    Default

    Quote Originally Posted by provamo View Post
    as a matter of general interest.............is there a preferred practice?
    The VW type 3 rotors (FST and Zink Z10 FF) normally use lug bolts 14x1.5mm. The rotors are cast gray iron. I drilled and reamed a pair of rotors for studs and my rotors cracked when the studs were installed. The rotors had been lightened with holes drilled in the face of the hub. The cracks were from the stud hole to the lightening hole.

    FF and CF guys usually use fully threaded bolts threaded in from the back side and tack welded the head to the hub prevent backing out.

    I tried the press in studs because I couldn't find fully threaded bolts in the length I needed at the time. I did eventually find some, they are in shipment.

    I have seen some FV guys use screw in studs.
    “Racing makes heroin addiction look like a vague wish for something salty.” -Peter Egan

  20. #20
    Senior Member
    Join Date
    10.06.08
    Location
    CT
    Posts
    371
    Liked: 22

    Default Rotors

    The rotors on the car were already set up when I received them. A machine stop typically drills a blank rotor into a 4x4 pattern, not something I'd really want to try at home. Based on my experance, the pressed in studs are easier to remove if they ever need replacing. Rotors tend to build up rust. Removing a screw in stud from a rusty rotor migth be an interesting task at a track.

  21. #21
    Senior Member
    Join Date
    10.06.08
    Location
    CT
    Posts
    371
    Liked: 22

    Default My new baby arrived...

    My New Baby arrived... not from the stork... not from Santa,,, but via Mr FedEx


    My new FST engine and with mostly NEW parts off the shelf!!! Very Cool.
    Thanks to SR!!!


  22. #22
    Senior Member Garry Sharp's Avatar
    Join Date
    09.19.08
    Location
    Dahlonega, Ga.
    Posts
    277
    Liked: 118

    Default Steering Brackets

    Where can you buy those Ackerman brackets?

    Garry

  23. #23
    Senior Member
    Join Date
    10.06.08
    Location
    CT
    Posts
    371
    Liked: 22

    Default Steering Brackets

    The steering brackets come from Larry Campbell. They corrected some issues I was having and prevent "over steering" lock.

    Larry Campbell, Campbell Motorsport, Inc Phone: 906-863-5003 Email:CampbellMotorsport@yahoo.com

  24. #24
    Senior Member
    Join Date
    10.06.08
    Location
    CT
    Posts
    371
    Liked: 22

    Default Finally Complete!

    Too many projects not enough time The car is finally finished.

    Special Thanks to Bill Bonow, Jim at SR and Robert Guhde!!!


    Enlarged head cooling ducts


    F-Duct....


    High tech sump tank (Thanks to Bill!)


  25. #25
    Senior Member
    Join Date
    11.08.07
    Location
    Rochester, NY
    Posts
    742
    Liked: 156

    Default Glad its done

    John

    Nice job. I know it was a ton of work getting everything to fit. Do you think it would be possible to get it out for a shakedown yet this year?

  26. #26
    Senior Member
    Join Date
    10.06.08
    Location
    CT
    Posts
    371
    Liked: 22

    Default

    Thanks, it was a [FONT=Verdana]challenge [/FONT]getting everything to fit and work. That being said, no reason why ANY FV couldn't be converted to an FST. All the oil lines transition smoothly with no sharp bends. More than enough oil in the sump tank, it's hard to see, but it extends way down into the chassis.

    Remaining races in the NE area are limited, but I'm planning on the Oct 6th Glen race. Hopefully my racing suit will keep me warm.
    Last edited by veefan; 09.24.12 at 4:34 PM.

  27. #27
    Member
    Join Date
    04.07.04
    Location
    White River Jct VT
    Posts
    81
    Liked: 0

    Default

    Great job John! Bring summer and winter clothes to the Glen. I've raced there at 38 degrees and 70 degrees in October.

  28. #28
    Senior Member
    Join Date
    08.25.09
    Location
    Sydney
    Posts
    159
    Liked: 39

    Default

    John
    Congratulations, and well done. The car looks great, and is a credit to you.
    I really appreciate the pictures you sent during the project.
    Maybe I will see it in the flesh sometime next year.
    Thanks
    Ray.

  29. #29
    Senior Member Mark Filip's Avatar
    Join Date
    08.28.07
    Location
    New Hampshire
    Posts
    744
    Liked: 20

    Default

    How did it go at thte Glen John?

    Mark
    Mark Filip

  30. #30
    Senior Member
    Join Date
    10.06.08
    Location
    CT
    Posts
    371
    Liked: 22

    Default Lime Rock Regional!!!!

    I finally got the FST on track and the car is amazing and she ran flawlessly.

    Oil temps perfect, Oil pressure perfect the sump system had no issues, etc etc etc!

    The one issue I had was head cooling, but it was related to something silly I did, once I realized it, it was an easy fix. The day was 80 +/- degrees in the afternoon, heads were right at 300 or less.

    The car was totally neutral, it was also very predictable, you could feel the slip, correct it, without a surprise snap spin that I experienced a few too many times in a Vee.

    DISK brakes, love them! predictable consistent, no push back, late braking without the stress of locking them up! Can't be beat, threshold breaking with $25 stock off the shelf pads, Adios $200+ brake shoes.

    I requested the grid workers to let me start last during both days to allow the other groups enjoy the race. I wanted to spend the weekend sorting and getting a feel for the car. Half way through the last race of the day, I decided push her a little and see what she had. I've always told guys I love building cars a lot more than I do racing them, after that last session, I'm pretty sure I've changed my mind!

    Anyone converting, keep building, you wont be disappointed!

    Thanks again to Bill, Robert, Jim and the SR guys JOB WELL DONE!

    John

  31. #31
    Contributing Member provamo's Avatar
    Join Date
    05.24.04
    Location
    Amherst, New York but i left my heart in San Francisco
    Posts
    2,667
    Liked: 295

    Default

    CONGRAULATIONS! i enjoyed following "the build" sounds like you are having fun!

  32. #32
    Global Moderator Bill Bonow's Avatar
    Join Date
    08.18.02
    Location
    Plainfield, IL
    Posts
    2,663
    Liked: 190

    Default

    John,

    Congratulations on getting your Caracal D converted and on the track. With almost 3000 views, I have to think that many ApexSpeeders followed your progress, thank you so much for posting your conversion project.

    Keep us informed of your ups and downs with the car through the season.

    I was so much looking forward to seeing the car at Watkins Glen for the Fun One, but just found out I will be in Germany in September for the International Welding Show "Schweissen und Schneiden" and can't make WGI
    Bill Bonow
    "Wait, which one is the gas pedal again?"

  33. #33
    Global Moderator Bill Bonow's Avatar
    Join Date
    08.18.02
    Location
    Plainfield, IL
    Posts
    2,663
    Liked: 190

    Default Before and After

    As an FV and as an FST
    Last edited by Bill Bonow; 08.01.16 at 12:38 PM.
    Bill Bonow
    "Wait, which one is the gas pedal again?"

  34. #34
    Senior Member
    Join Date
    11.08.07
    Location
    Rochester, NY
    Posts
    742
    Liked: 156

    Default This weekend

    I've heard there was an on track debut this weekend!

  35. #35
    Senior Member
    Join Date
    10.06.08
    Location
    CT
    Posts
    371
    Liked: 22

    Default Looks preaty cool going fast

    First on track pictures, looks cool going fast!!!!


  36. #36
    Global Moderator Bill Bonow's Avatar
    Join Date
    08.18.02
    Location
    Plainfield, IL
    Posts
    2,663
    Liked: 190

    Default

    John,

    Great photo, the wheels are turning!!
    Bill Bonow
    "Wait, which one is the gas pedal again?"

  37. #37
    Member
    Join Date
    11.28.07
    Location
    Conneaut, Ohio
    Posts
    33
    Liked: 1

    Default lower front shock mount

    pretty car! curious where you found your lower front shock mount "extensions"?

  38. #38
    Global Moderator Bill Bonow's Avatar
    Join Date
    08.18.02
    Location
    Plainfield, IL
    Posts
    2,663
    Liked: 190

    Default

    Phil, I've got them, send me an email or PM
    Last edited by Bill Bonow; 03.09.14 at 11:55 AM.
    Bill Bonow
    "Wait, which one is the gas pedal again?"

Thread Information

Users Browsing this Thread

There are currently 3 users browsing this thread. (0 members and 3 guests)

Posting Permissions

  • You may not post new threads
  • You may not post replies
  • You may not post attachments
  • You may not edit your posts
  •  


About Us
Since 2000, ApexSpeed.com has been the go-to place for amateur road racing enthusiasts, bringing together a friendly community of racers, fans, and industry professionals. We're all about creating a space where people can connect, share knowledge, and exchange parts and vehicles, with a focus on specific race cars, classes, series, and events. Our community includes all major purpose-built road racing classes, like the Sports Car Club of America (SCCA) and various pro series across North America and beyond. At ApexSpeed, we're passionate about amateur motorsports and are dedicated to helping our community have fun and grow while creating lasting memories on and off the track.
Social