Hi,
I have a Leastone formula Vee. The gearchange is very very tight. I was hoping that someone could post pics of their linkage setups and or give tips to create a smooth gear change.
Regards..
Steve


Hi,
I have a Leastone formula Vee. The gearchange is very very tight. I was hoping that someone could post pics of their linkage setups and or give tips to create a smooth gear change.
Regards..
Steve
Steve,
The first step would be to disconnect the linkage at the hockey stick in the back and make SURE that there is no binding on the shaft from front to rear (shifter knob moves freely in all required directions).
2nd step would be to Lock one end of the shifting mechanism tightly and check the free play - i.e. How much movement do you have at the 'free' end with the other end locked? It should be as close to zero as possible - within the parameters that it must also be "free" to move if the opposite end is free (hope that makes sense).
3rd step is to take some pliers (vicegrips?) and grab the end of the hockey stick and make sure that each gear in the trans is accessible and the stick (shaft) moves freely between gears. You will probably need someone to rotate a tire slightly in some cases to have the gear selector drop into gear. It takes a fair amount of pressure to get it OUT or IN to each gear, but the shaft itself should move pretty easily.
Then put all this together.
There are many methods of holding the shaft - many different ideas on how many STIFF (not necessarily straight) sections are best - different ideas on the best type of universal joints to use (most of us use 'helicopter' joints - heavy duty and covered with a bellows that keeps dirt and moisture out of the joint while holding lubricant in).
Another thing to check on is that the end of the shaft at the trans nose cone must exert FORE/AFT force on the hockey stick without putting undue side load on it. If it pushes too much sideways, it'll be loading the bushing in the trans nose cone and wear it out prematurely. THAT (the nose cone bushing) is also something that should be checked. It involves removing the shifting mechanism, then the nose cone from the trans, taking the hockey stick out, and visually inspecting the bushing(s --- there are actually 2 in there in most cones) - if it is significantly worn, it's usually pretty obvious from a visual inspection. It's a PITA to get the old one out and a new one in without damaging the new one, but it can be done if you don't try to move too fast. Just make sure you don't damage the internals of the cone getting the old one out - the old bushing is trash.. the nose cone isn't (hopefully)
Sorry I don't have a pic at the moment, but if you have any specific question I can probably answer it or get a pic later today after it warms up a bit (6 degrees here this morning). I'm assuming you are not working from scratch and that you have a car and shifting process that USED to work more or less properly.
Steve, FV80
Hi Steve.
Your going to need to diss-amssemble and inspect every part of the linkage. Clean and lube as you go. The shifter rod should be a smooth as it passes though any bearings or bushings. Pop the rear gearbox cover off and make sure the 'hockey Stick' is free , but not loose.
Good luck
Tony
Thanks guys. Some great info.to.work from. There are no nice helicopter joints on my linkage just two shafts with sockets welded on. The system works but it takes some really forceful gearchanges to ensure a smooth shift. I usually come in with a cut hand. Guess that's part of my problem. What u joints or helicopter joints do you guys suggest using? Any photos of similar setups?
I will double check the bushings this weekend.
Link to typical joints:
https://www.pegasusautoracing.com/pr...p?Product=1490
Might be found surplus or cheaper somewhere...
We see them ('u-joints') on eBay occasionally at good prices. Not sure that's a good option for Ireland
If you currently have 'ratchet socket u-joints', then that explains a LOT. They have TONS of slop in them brand new. A little bit of wear and they're useless .. kinda like they were when new (for this purpose)
Steve, FV80
Thanks guys photos of similar setups would be really appreciated.
Hi ,
Thanks for all the tips, there may be a small bend in my linkage causing play. Will straighten this weekend. Are there any good race shift knobs that people recommend? I use an aluminum one which cuts my hand during hard racing. Any suggestions?
The number of shifts per lap for FV should not be an issue with your hand regardless of what kind of shifter you use. Sounds like you have too much drag in your linkage or too much inside the trans. ... or maybe your shift "mechanical advantage" is too small.
The hockey stick only has to move about 3/4 inch forward and then a full 1 1/2 inches rearward to get the gears. The top of my shifter moves about 3 times that to get 'ease of shift' that I want. I've seen many that have much less advantage and still 'get it done' without undue hassle. Still, if everything else is working correctly, that would be the easiest method of making the shifting easier.
You've asked for pix of other options - how about posting pix of YOUR set up. One of us might see something that can help.
I'd be glad to take pix of mine, but it's loaded up in the trailer already - leaving today. We'll be back on Monday, so I can take pix at that time.. or maybe even during the weekend if I think about it and can get access to the internet to post 'em.
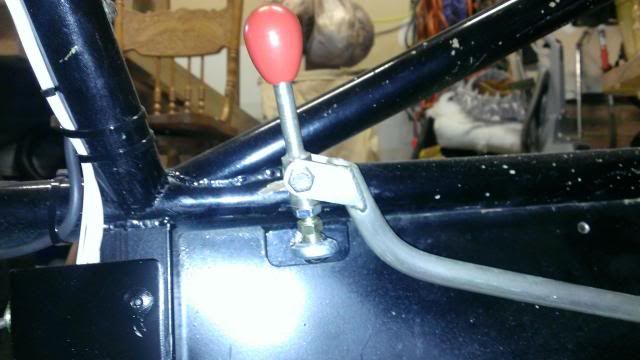
Oh yeah.. my shift 'handle' is just the end of a piece of ~3/4 tubing with the end rounded off for no sharp edges. I've seen all kinds of knobs though - most anything should work just fine if you have room for it.
Steve, FV80
Last edited by Steve Davis; 02.05.14 at 10:02 AM. Reason: added last paragraph
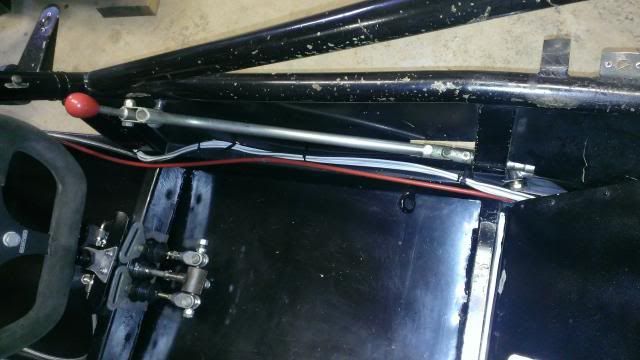
Sorry my photos are not better. I will take more this weekend.
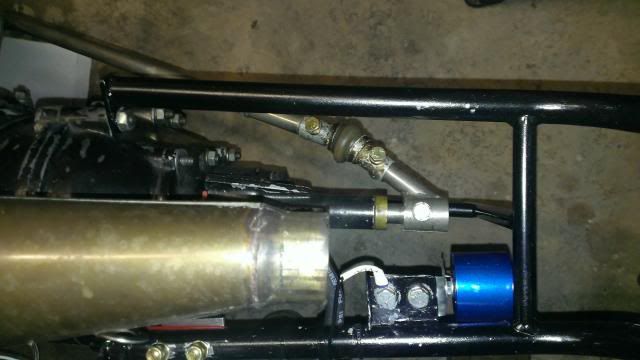
Steve,
If what I see is correct, it looks as though you may be a bit "short" of joints, as I see only one. I would think this would require perfect alignment anywhere the shafting passes through a bushing, which is a bit hard to do. Edit: Your shaft looks to be higher up than most, probably requiring fewer joints.
My Citation uses three joints and has two bushings holding everything in alignment. I have attached some pics, maybe you can get an idea from these. Stevan Davis instruction set is about as good as you'll get...
Last edited by BLS; 02.06.14 at 2:35 PM.


Steve,
Once you correct your problem, you need to add some protection to the rear of
your tranny so the linkage / hockey stick doesn't get damaged when contact is
made.
Mark
88' Citation 002'
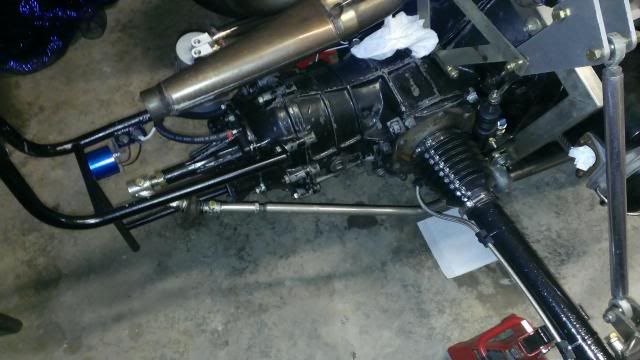
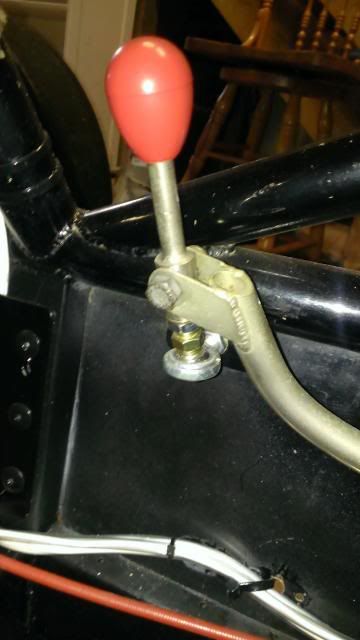
From what I see in your pix, the main problem is that you are pulling DIRECTLY on the shift shaft with ZERO mechanical advantage. The the drag of even a free shaft over that length, it's going to be TOUGH.
Barry's pic of his shifter shows an angle that does NOT reflect the offset of the actual shift HANDLE attachment to the shaft - but he has one. Maybe only 1.5 to 1 or so, but ..
if you look really closely, you'll see a heim joint beneath the shift shaft. There is an angle on the front of the shaft and the 'stick' connects at that top point, so that the shaft can rotate without requiring the centerline of the shaft to move.
Think in terms of this...
Mount a heim joint to the frame about 1/4 inch below the shift shaft.
Make the shift shaft "FREE" at the front.
Put a shift 'stick' through the heim joint vertically.
Attach the 'stick' to the shift shaft (somehow - at the top of that angle I mentioned).
Put your shift HANDLE on top of the 'stick'.
*NOW* when you push/pull on the handle, you have mechanical advantage on the shaft. Make it so it gives you whatever advantage you want and adjust accordingly.
Hope this makes sense. Maybe Barry can take a pic that shows the shift end better. Mine is a totally different design .. and it's in the high 30's here (New Orleans) with a wind chill well down into the 20's.
Steve, FV80
Steve,
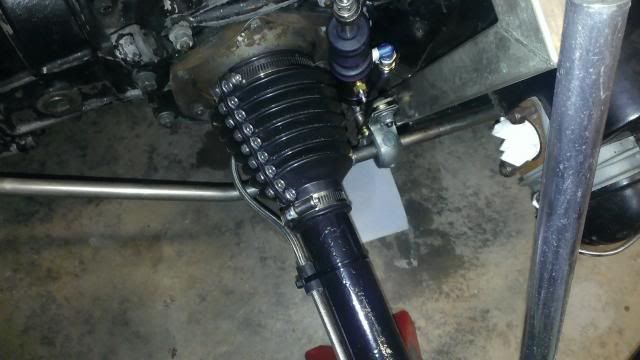
I now see what Stevan pointed out, you have no leverage on your shaft. The shifter you have just slides the linkage back and forth. I understand why it is difficult to shift.
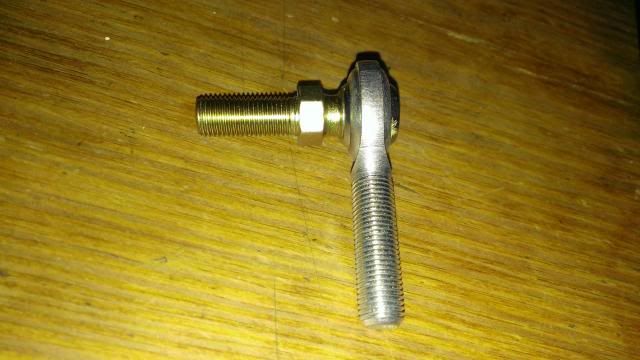
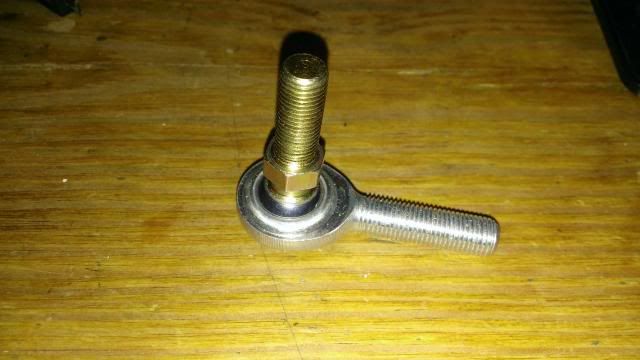
I have attached pics of the Citation shifter. The shifter is actually just a rod end with a built in stud and provides something like a 2:1 ratio, reducing the force by a half and doubling the hand movement. I bought a new one since mine was worn out when I got the car. I can dig up the type/part # should you need it.
Thanks a million guys for all the photos,tips and suggestions. BLS if you do know the part number that would be fantastic, really need to reduce the pressure required to change gear.
Good advice on the shift linkage. After you get that fixed I am wondering how you get the engine in the frame?
Steve,
QA1 part # CMR6TS is a 3/8 rod end with a 3/8 stud. Looks like this:
Thanks a million much appreciated, how did you get the 3/8 rod stud fixed into the rod end?. I will give that a go and let you know if it makes a difference
Steve, the part # I gave you includes the 3/8 stud already fixed in the rod end. I would think there are brands other than QA1 that have these. I see no reason you could not use a normal rod end with a bolt through it with a bit of effort.
Also, I have noticed the pictures of this part # at a supplier do not show the stud, just a normal rod end. But, this part # includes the stud fixed in place.
Regards,
Barry
Thanks Barry much appreciated
Steve,
In addition to all the good advice you have already received, an additional item to check is to make sure that when you are strapped in, neither you nor the belts interfere with the shift rod. Likewise any suspension movement or anything else that prevents free movement of your linkage while the car is on the track should be corrected/prevented.
Something else I have encountered is if the tubing is too thin, or not as strong (such as aluminum vs steel), you may experience some simple bending/deflection of the tubing that may adversely affect the shifting too.
Good luck.
-Jim
Thanks guys. I have been searching for a UK/Ireland stockists without success. Postage for the part is 60 which is a disgrace. Hope I can find an alternative. Looks exactly like what I need. Does anyone here know of a European stockist?
Steve,
There are alternatives. Since you will need to fabricate a shifter for any modification, not much more work to find or fabricate a bolt to go through a normal rod end. The stud type rod end does make it easy. Then there are alternative designs. You could have a rod end on the shifter itself, with a bolt sticking out to mount it with. Anything that will allow you to rotate the shaft and provide leverage on the fore/aft movement will probably work. The Citation design I have is just one way, there are more.
Barry
I just purchased a Vee yesterday. No one is sure what it is. One of the thing it needs is a complete shifter set up. You guys have given hints on here as to a couple of the parts... But is there a place to buy one or detailed instructions on how to build one? Any suggestion would be great...
David,
Although pretty much every make of vee is unique, there are commonalities to all. However, without having a CLUE of what you have to work with, we can't add much to what's already been said here.
If you could post a picture of what you have it might help. You might also try to find a vee in your area, although I'm not aware of another one even in your STATE. You might find your closest SCCA region http://www.scca.com/about/?cid=44660&r=sp and see if maybe there is a SOLO event you could attend. There might be a Vee there. They (solo) are not very active on these forums, but you MIGHT find someone around that can help you out.
Are you the guy from Las Vegas that signed up in the FV Registry? If so, you are the ONLY guy in the state registered - if not, I might be able to put you in contact with the other one
Steve, FV80
BTW - congrats on taking the first step to getting STARTED
Hi Steve,
Thank you for the reply. There are a couple guys running Vee's in autocross here. I did not register yet. I have about a thirty year old barn find. No steering set up and no shifter set up..
Both seem very common among Vee's... I would like to update and run Formula First. It's a project for my son and I. We run karts and I did own a 97 Dallara IRL car... But everything I bought off the shelf... This has been tough to find any info on fabricating a shifter from scratch. And I will have to do the steering the same. Also if anyone knows the model please let me know. I have had 20 different models.. I will try to post better shots. Person I traded with had added the new engine 1600cc
Not sure why I could upload multiple but it only posted 1
Here is another shot
David,
Looks to be of fairly recent design - due to the front/rear roll hoop configurations and the configuration of the rear trailing arms. I see 75 on a rear cowl in the background. Has the car been raced? Did you get a log book? It MIGHT have been built strictly for autocross and therefore not 'logbooked' .. or maybe just never completed.
I think you might want to try to trace it back to it's roots. Who did you get it from ? Where did he get it, etc. The original builder (if still around) could easily fill in some blanks for you.
Another thing you might want to do is have a 'FV type' tech guy (scruitineer) look it over for some basic legality issues before you put too much into it. If it was built for AX, it might not have the basic tubing thicknesses required for Club Racing.
Also .. a pic of the car with bodywork on might help track the builder/driver down.
Steering - there appear to be 2 plates along the center of the car from the front hoop toward the front beam. Those are probably mounting plates for bushings to support a straight shaft from the steering wheel to .. near the beam, where the steering box was mounted - very similar to the steering installation on an original bug. The pitman arm of the box attaches to one of the wheels and the straight rod across steers the opposite wheel. That method is generally known as ZERO ACKERMAN as it insures that both front wheels turn at the same angle. Although it works well in high speed sweepers, it causes PUSH in slow turns and therefore would NOT be very good for ax, I think.
Shift mechanism -- an "angle piece" would be attached to the shift (hockey) stick coming out of the back of the trans. Usually a slip fit over the end of the stick with a bolt to tighten it onto the stick. There will need to be universal joints at at least 2 places along the shifter rod to the front - sometimes 3. It depends on how good a 'straight shot' you can get from the trans area to the location of the shift knob .. and exactly where you WANT that shift knob to be. Start with those 2 points and read the info in the previous posts about how to build the shifter mechanism. Keep in mind that the shift rod cannot pass THROUGH the engine
There are a million ways to do it .. and at least 1/2 million ways to do it WRONG - so take your time - make sure the 'linear' parts of the shifter move freely. And ... before you start, make sure you can shift the trans through all of it's gears from the hockey stick with vice grips or similar. Sitting at the rear - clamp onto the stick and find neutral - you should be able to hold the input shaft and lift and spin one tire - it might drag a bit when cold, but you can hold the shaft with your hand. The stick should rotate freely about 30 degrees or so.
Rotate stick full CCW and PULL - it should go into reverse (might need to move a wheel a bit to get it to lock in). Now the input shaft will be locked to the rotation of the wheel. Push forward (back to the middle, neutral position). Rotate the stick full CW and PULL - that should be 4th gear. The input shaft should rotate in the opposite direction. Then PUSH forward past neutral and into 3rd, checking input shaft again. 2nd gear would be in the middle of rotation between reverse and 4th (PULL) - then 1st straight forward PUSH.
This may sound basic, but if you have no idea when the car was last functional, you really don't know that the trans has ever worked.
Hope this helps.
Steve, FV80
BTW - if you drop me an email (steve -at- wedgeracing -dot- com), I can give you some info on the other Las Vegas guy so you can contact him. He's also new and may not have ever gotten a car .. but you guys might want to get together any way
PPS .. you might check the main roll hoop for a log book number. It should be stamped into the tubing - driver's left side near the junction with the upper front support tubing. If there's a number there, the car probably had a log book.
There are currently 1 users browsing this thread. (0 members and 1 guests)
 Posting Permissions

 Reply With Quote